Sign in to Accesstive, add the Accessibility Widget to your website, and run your first accessibility check.
This guide takes you from your first sign-in to your first accessibility check. It takes about 10 minutes.
Before you begin
You need:
A website you can edit (HTML templates, a CMS plugin, or Google Tag Manager)
A website served over HTTPS
A website that anyone can open. Sites behind a password prompt (HTTP authentication) cannot be checked.
Create an account and sign in
1
Create your account
Open the Accesstive login page and click Create Account. You are taken to the free trial sign-up on accesstive.com. Enter your details and your website address, including https://.
2
Sign in
Back on the login page, enter your Email and Password, then click LOGIN. If you forgot your password, click Forgot your password?.
The Accesstive login page
3
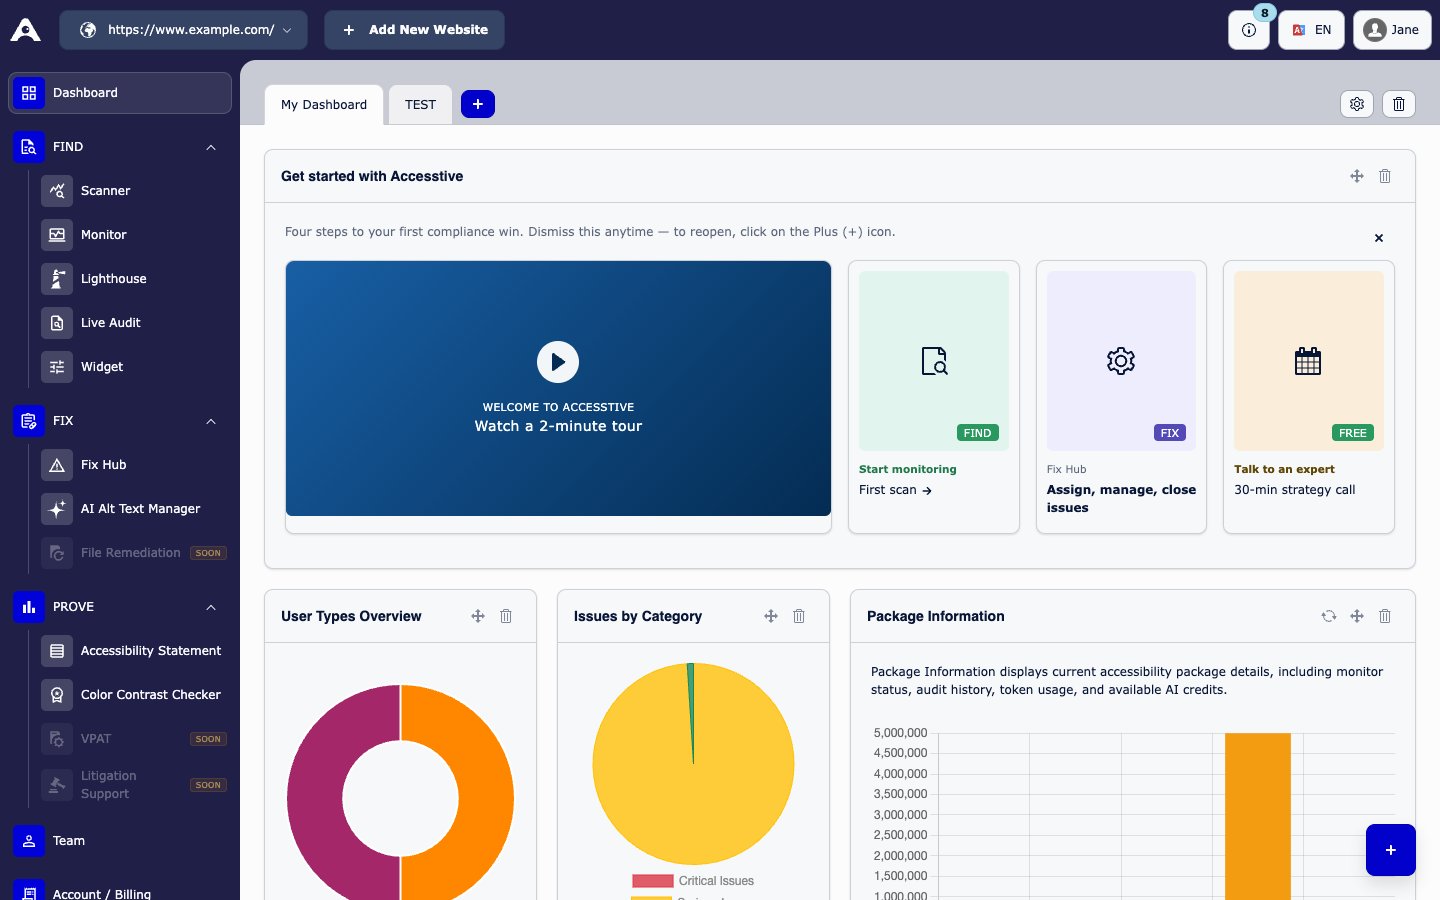
Start on the dashboard
After you sign in, you land on the Dashboard. Paid plans start with a 14-day free trial. A banner shows how many trial days you have left.
The dashboard after you sign in
Add Accesstive to your website
Pick the method that fits your website. You find the same options in the dashboard under FIND → Widget → Installation Guide.
Option 1: Add the script (any website)
1
Copy your code
In the dashboard, open FIND → Widget and expand Installation Guide. Click Copy. Your code looks like this. The data-token value is unique to your website:
{"docsConfig":{"theme":"mint","$schema":"https://mintlify.com/docs.json","name":"Accesstive Docs","description":"Accesstive documentation: install the widget, find and fix accessibility issues, document your work, and manage your account.","colors":{"primary":"#0101D9","light":"#EEF0FF","dark":"#0101D9"},"logo":{"light":"https://mintcdn.com/accesstive-01e1bd34/2cK1UJhpHt3fjE9x/logo/light.svg?fit=max\u0026auto=format\u0026n=2cK1UJhpHt3fjE9x\u0026q=85\u0026s=13e20deb45a95510c3530812fe994631","dark":"https://mintcdn.com/accesstive-01e1bd34/2cK1UJhpHt3fjE9x/logo/dark.svg?fit=max\u0026auto=format\u0026n=2cK1UJhpHt3fjE9x\u0026q=85\u0026s=b98481c12a868b9d45fdb6b8480cdbdd","href":"/"},"favicon":"https://mintcdn.com/accesstive-01e1bd34/2cK1UJhpHt3fjE9x/favicon.png?fit=max\u0026auto=format\u0026n=2cK1UJhpHt3fjE9x\u0026q=85\u0026s=cbea289b23bc3c6e0604dbc863d7a146","appearance":{"default":"system","strict":false},"navbar":{"links":[{"href":"/getting-started","label":"Get started"},{"href":"/dashboard","label":"Guides"},{"href":"/faq","label":"FAQ"},{"href":"mailto:info@accesstive.com","label":"Support"}],"primary":{"type":"button","label":"Get started","href":"/getting-started"}},"footer":{"socials":{"website":"https://accesstive.com","x":"https://x.com/accesstive","linkedin":"https://www.linkedin.com/company/accesstive","youtube":"https://www.youtube.com/@Accesstive-web-accessibility"},"links":[{"header":"Documentation","items":[{"label":"Get started","href":"/getting-started"},{"label":"Dashboard tour","href":"/dashboard"},{"label":"Scanner and Monitor","href":"/monitor"},{"label":"Live Audit","href":"/live-audit"},{"label":"Fix Hub","href":"/fix-hub"},{"label":"Plans and billing","href":"/billing"},{"label":"FAQ","href":"/faq"}]},{"header":"Product","items":[{"label":"Dashboard login","href":"https://dashboard.accesstive.com/app"},{"label":"Accessibility Widget","href":"https://accesstive.com/accessibility-widget"},{"label":"Pricing","href":"https://accesstive.com/pricing"},{"label":"Free Live Audit","href":"https://accesstive.com/live-audit"}]},{"header":"Resources","items":[{"label":"Help Center","href":"https://accesstive.com/help-center"},{"label":"Schedule demo","href":"https://calendly.com/accesstive"},{"label":"Contact support","href":"mailto:info@accesstive.com"},{"label":"Privacy policy","href":"https://accesstive.com/privacy-policy"},{"label":"Imprint","href":"https://accesstive.com/imprint"}]}]},"seo":{"metatags":{"og:site_name":"Accesstive Docs","og:type":"website","og:locale":"en_US","twitter:card":"summary"},"indexing":"all"},"fonts":{"heading":{"family":"Montserrat","weight":700},"body":{"family":"Montserrat","weight":400}},"icons":{"library":"lucide"},"styling":{"eyebrows":"breadcrumbs","codeblocks":{"theme":{"light":"github-light","dark":"github-dark"}},"latex":false},"errors":{"404":{"redirect":false,"title":"Page not found","description":"This page does not exist in Accesstive Docs. [Go to homepage](/)."}},"contextual":{"options":["copy","view","chatgpt","claude","perplexity","mcp","cursor","vscode"],"display":"header"},"metadata":{"timestamp":false},"navigation":{"pages":[]}},"deployment":{"deploymentMetadataValue":{"subdomain":"accesstive-01e1bd34","hasAudioNarration":false,"actualSubdomain":"accesstive-01e1bd34","customDomains":[],"gitSource":{"type":"github","owner":"accesstive","repo":"docs-accesstive","deployBranch":"main","contentDirectory":"","isPrivate":false,"mountPath":"","label":"","_id":"6afed16339f91bec5a00104d"},"entitlements":{"AI_CHAT":{"status":"ENABLED"},"WEB_MCP":{"status":"ENABLED"},"NARRATION":{"status":"ENABLED"}},"buildId":"6afed4b942e7ae4824d494f2","clientVersion":"0.0.4205","searchFilterCounts":[{"language":"default","tag":"Account","count":4},{"language":"default","tag":"FIND","count":4},{"language":"default","tag":"FIX","count":3},{"language":"default","tag":"PROVE","count":2},{"language":"default","tag":"Get started","count":2},{"language":"default","tag":"Home","count":1}]},"assistantConfig":{"enableAskAiButton":false,"enableStarterQuestions":false,"enableContextualStarterQuestions":false,"enableAskAiSearchBar":true},"basePath":"","hasChatPermissions":true,"hasWebMcpPermissions":true,"toggles":[{"name":"kill-isr","enabled":true,"variant":{"name":"disabled","enabled":false,"feature_enabled":true},"impressionData":false},{"name":"custom-rbac-roles","enabled":true,"variant":{"name":"disabled","enabled":false,"feature_enabled":true},"impressionData":false},{"name":"agent-mintlify-slack","enabled":true,"variant":{"name":"disabled","enabled":false,"feature_enabled":true},"impressionData":false},{"name":"agent-integrations-settings","enabled":true,"variant":{"name":"disabled","enabled":false,"feature_enabled":true},"impressionData":false},{"name":"rbac-expansion","enabled":true,"variant":{"name":"disabled","enabled":false,"feature_enabled":true},"impressionData":false},{"name":"automations-pr-grouping","enabled":true,"variant":{"name":"disabled","enabled":false,"feature_enabled":true},"impressionData":false},{"name":"custom-prefix","enabled":true,"variant":{"name":"disabled","enabled":false,"feature_enabled":true},"impressionData":false},{"name":"analytics-v7","enabled":true,"variant":{"name":"disabled","enabled":false,"feature_enabled":true},"impressionData":false},{"name":"user-flows-analytics","enabled":true,"variant":{"name":"disabled","enabled":false,"feature_enabled":true},"impressionData":false},{"name":"no-publish-flow","enabled":true,"variant":{"name":"disabled","enabled":false,"feature_enabled":true},"impressionData":false},{"name":"workos-onboarding","enabled":true,"variant":{"name":"disabled","enabled":false,"feature_enabled":true},"impressionData":false},{"name":"snapshot-serving-live","enabled":true,"variant":{"name":"disabled","enabled":false,"feature_enabled":true},"impressionData":false},{"name":"stripTemperatureMiddleware","enabled":true,"variant":{"name":"disabled","enabled":false,"feature_enabled":true},"impressionData":false},{"name":"support-platform-pylon-zendesk","enabled":true,"variant":{"name":"disabled","enabled":false,"feature_enabled":true},"impressionData":false},{"name":"snapshot-serving","enabled":true,"variant":{"name":"disabled","enabled":false,"feature_enabled":true},"impressionData":false},{"name":"instant-rollback","enabled":true,"variant":{"name":"disabled","enabled":false,"feature_enabled":true},"impressionData":false},{"name":"granular-notifications-server","enabled":true,"variant":{"name":"disabled","enabled":false,"feature_enabled":true},"impressionData":false},{"name":"granular-notifications","enabled":true,"variant":{"name":"disabled","enabled":false,"feature_enabled":true},"impressionData":false},{"name":"automations-fable","enabled":true,"variant":{"name":"disabled","enabled":false,"feature_enabled":true},"impressionData":false},{"name":"fixed-ai-action-pricing","enabled":true,"variant":{"name":"disabled","enabled":false,"feature_enabled":true},"impressionData":false},{"name":"automation-resolve-merge-conflict","enabled":true,"variant":{"name":"disabled","enabled":false,"feature_enabled":true},"impressionData":false},{"name":"scoped-publishing","enabled":true,"variant":{"name":"disabled","enabled":false,"feature_enabled":true},"impressionData":false},{"name":"mintql","enabled":true,"variant":{"name":"disabled","enabled":false,"feature_enabled":true},"impressionData":false},{"name":"page-level-analytics","enabled":true,"variant":{"name":"disabled","enabled":false,"feature_enabled":true},"impressionData":false},{"name":"editor-version-history-v2","enabled":true,"variant":{"name":"disabled","enabled":false,"feature_enabled":true},"impressionData":false},{"name":"billing-page-v2","enabled":true,"variant":{"name":"disabled","enabled":false,"feature_enabled":true},"impressionData":false},{"name":"full-page-search","enabled":true,"variant":{"name":"disabled","enabled":false,"feature_enabled":true},"impressionData":false},{"name":"workspace-projects","enabled":true,"variant":{"name":"disabled","enabled":false,"feature_enabled":true},"impressionData":false},{"name":"assistant-v5","enabled":true,"variant":{"name":"disabled","enabled":false,"feature_enabled":true},"impressionData":false},{"name":"fork-pr-previews","enabled":true,"variant":{"name":"disabled","enabled":false,"feature_enabled":true},"impressionData":false},{"name":"revalidation-jwt","enabled":true,"variant":{"name":"disabled","enabled":false,"feature_enabled":true},"impressionData":false},{"name":"workos-sso-scim","enabled":true,"variant":{"name":"disabled","enabled":false,"feature_enabled":true},"impressionData":false},{"name":"hobby-abuse-scan","enabled":true,"variant":{"name":"disabled","enabled":false,"feature_enabled":true},"impressionData":false},{"name":"dashboard-inbox","enabled":true,"variant":{"name":"disabled","enabled":false,"feature_enabled":true},"impressionData":false},{"name":"workos-signup","enabled":true,"variant":{"name":"disabled","enabled":false,"feature_enabled":true},"impressionData":false},{"name":"turbopuffer-dual-write","enabled":true,"variant":{"name":"disabled","enabled":false,"feature_enabled":true},"impressionData":false},{"name":"workos-enabled","enabled":true,"variant":{"name":"disabled","enabled":false,"feature_enabled":true},"impressionData":false},{"name":"approve-review-flow","enabled":true,"variant":{"name":"disabled","enabled":false,"feature_enabled":true},"impressionData":false},{"name":"editor-metadata","enabled":true,"variant":{"name":"disabled","enabled":false,"feature_enabled":true},"impressionData":false},{"name":"sso-setup-deadline-banner","enabled":true,"variant":{"name":"disabled","enabled":false,"feature_enabled":true},"impressionData":false},{"name":"turbopuffer-serve","enabled":true,"variant":{"name":"disabled","enabled":false,"feature_enabled":true},"impressionData":false},{"name":"live-agents","enabled":true,"variant":{"name":"disabled","enabled":false,"feature_enabled":true},"impressionData":false},{"name":"starter-pricing","enabled":true,"variant":{"name":"treatment","enabled":true,"payload":{"type":"string","value":"treatment"},"feature_enabled":true},"impressionData":false},{"name":"llms-txt-v2","enabled":true,"variant":{"name":"disabled","enabled":false,"feature_enabled":true},"impressionData":false},{"name":"wildcard-email-auth","enabled":true,"variant":{"name":"disabled","enabled":false,"feature_enabled":true},"impressionData":false}],"googleFontsInlined":true},"customCss":[],"page":{"pagePath":"getting-started","slug":"/getting-started","pageMetadata":{"title":"Getting started","description":"Sign in to Accesstive, add the Accessibility Widget to your website, and run your first accessibility check.","href":"/getting-started"},"description":{"compiledSource":"\"use strict\";\nconst {jsx: _jsx} = arguments[0];\nconst {useMDXComponents: _provideComponents} = arguments[0];\nfunction _createMdxContent(props) {\n const _components = {\n p: \"p\",\n ..._provideComponents(),\n ...props.components\n };\n return _jsx(_components.p, {\n children: \"Sign in to Accesstive, add the Accessibility Widget to your website, and run your first accessibility check.\"\n });\n}\nfunction MDXContent(props = {}) {\n const {wrapper: MDXLayout} = {\n ..._provideComponents(),\n ...props.components\n };\n return MDXLayout ? _jsx(MDXLayout, {\n ...props,\n children: _jsx(_createMdxContent, {\n ...props\n })\n }) : _createMdxContent(props);\n}\nreturn {\n default: MDXContent\n};\n","frontmatter":{},"scope":{}},"pageType":"default","mdx":{"mdxSource":{"compiledSource":"\"use strict\";const{Fragment:_Fragment,jsx:_jsx,jsxs:_jsxs}=arguments[0];const{useMDXComponents:_provideComponents}=arguments[0];function _createMdxContent(props){const _components={a:`a`,code:`code`,li:`li`,ol:`ol`,p:`p`,pre:`pre`,span:`span`,strong:`strong`,ul:`ul`,..._provideComponents(),...props.components},{CodeBlock,Frame,Heading,OptimizedImage,Step,Steps}=_components;if(!CodeBlock)_missingMdxReference(`CodeBlock`,true);if(!Frame)_missingMdxReference(`Frame`,true);if(!Heading)_missingMdxReference(`Heading`,true);if(!OptimizedImage)_missingMdxReference(`OptimizedImage`,true);if(!Step)_missingMdxReference(`Step`,true);if(!Steps)_missingMdxReference(`Steps`,true);return _jsxs(_Fragment,{children:[_jsx(_components.p,{children:`This guide takes you from your first sign-in to your first accessibility check. It takes about 10 minutes.`}),`\n`,_jsx(Heading,{level:`2`,id:`before-you-begin`,children:`Before you begin`}),`\n`,_jsx(_components.p,{children:`You need:`}),`\n`,_jsxs(_components.ul,{children:[`\n`,_jsx(_components.li,{children:`A website you can edit (HTML templates, a CMS plugin, or Google Tag Manager)`}),`\n`,_jsx(_components.li,{children:`A website served over HTTPS`}),`\n`,_jsx(_components.li,{children:`A website that anyone can open. Sites behind a password prompt (HTTP authentication) cannot be checked.`}),`\n`]}),`\n`,_jsx(Heading,{level:`2`,id:`create-an-account-and-sign-in`,children:`Create an account and sign in`}),`\n`,_jsxs(Steps,{children:[_jsx(Step,{title:`Create your account`,children:_jsxs(_components.p,{children:[`Open the `,_jsx(_components.a,{href:`https://dashboard.accesstive.com/app/`,children:`Accesstive login page`}),` and click `,_jsx(_components.strong,{children:`Create Account`}),`. You are taken to the free trial sign-up on accesstive.com. Enter your details and your website address, including `,_jsx(_components.code,{children:`https://`}),`.`]})}),_jsxs(Step,{title:`Sign in`,children:[_jsxs(_components.p,{children:[`Back on the login page, enter your `,_jsx(_components.strong,{children:`Email`}),` and `,_jsx(_components.strong,{children:`Password`}),`, then click `,_jsx(_components.strong,{children:`LOGIN`}),`. If you forgot your password, click `,_jsx(_components.strong,{children:`Forgot your password?`}),`.`]}),_jsx(Frame,{caption:`The Accesstive login page`,children:_jsx(OptimizedImage,{src:`https://mintcdn.com/accesstive-01e1bd34/2cK1UJhpHt3fjE9x/images/getting-started/login.png?fit=max\u0026auto=format\u0026n=2cK1UJhpHt3fjE9x\u0026q=85\u0026s=94f14079762258bc90da8fe9c784cfd5`,alt:`Accesstive login page with Email and Password fields, a LOGIN button, and a Create Account link`,\"data-og-width\":`1440`,width:`1440`,\"data-og-height\":`900`,height:`900`,\"data-path\":`images/getting-started/login.png`,\"data-optimize\":`true`,\"data-opv\":`3`,srcset:`https://mintcdn.com/accesstive-01e1bd34/2cK1UJhpHt3fjE9x/images/getting-started/login.png?w=280\u0026fit=max\u0026auto=format\u0026n=2cK1UJhpHt3fjE9x\u0026q=85\u0026s=ae904224a02077d7f69c2d1903d2d2f9 280w, https://mintcdn.com/accesstive-01e1bd34/2cK1UJhpHt3fjE9x/images/getting-started/login.png?w=560\u0026fit=max\u0026auto=format\u0026n=2cK1UJhpHt3fjE9x\u0026q=85\u0026s=7a64e88a9e5794df692efbb40d13ce09 560w, https://mintcdn.com/accesstive-01e1bd34/2cK1UJhpHt3fjE9x/images/getting-started/login.png?w=840\u0026fit=max\u0026auto=format\u0026n=2cK1UJhpHt3fjE9x\u0026q=85\u0026s=043abf0d51006eb66062a2a1b7bd61a3 840w, https://mintcdn.com/accesstive-01e1bd34/2cK1UJhpHt3fjE9x/images/getting-started/login.png?w=1100\u0026fit=max\u0026auto=format\u0026n=2cK1UJhpHt3fjE9x\u0026q=85\u0026s=709a59f7c728119b814afc34381fee30 1100w, https://mintcdn.com/accesstive-01e1bd34/2cK1UJhpHt3fjE9x/images/getting-started/login.png?w=1650\u0026fit=max\u0026auto=format\u0026n=2cK1UJhpHt3fjE9x\u0026q=85\u0026s=bfb153bd9b35844018e218bf52d805f7 1650w, https://mintcdn.com/accesstive-01e1bd34/2cK1UJhpHt3fjE9x/images/getting-started/login.png?w=2500\u0026fit=max\u0026auto=format\u0026n=2cK1UJhpHt3fjE9x\u0026q=85\u0026s=b5b6becea01ad8a9281c1f7114209d14 2500w`})})]}),_jsx(Step,{title:`Start on the dashboard`,children:_jsxs(_components.p,{children:[`After you sign in, you land on the `,_jsx(_components.strong,{children:`Dashboard`}),`. Paid plans start with a `,_jsx(_components.strong,{children:`14-day free trial`}),`. A banner shows how many trial days you have left.`]})})]}),`\n`,_jsx(Frame,{caption:`The dashboard after you sign in`,children:_jsx(OptimizedImage,{src:`https://mintcdn.com/accesstive-01e1bd34/2cK1UJhpHt3fjE9x/images/dashboard/overview.png?fit=max\u0026auto=format\u0026n=2cK1UJhpHt3fjE9x\u0026q=85\u0026s=fc84f05c0dd61d87b00d176c4fc2be1c`,alt:`Accesstive dashboard after sign-in with the Get started with Accesstive strip`,\"data-og-width\":`1440`,width:`1440`,\"data-og-height\":`900`,height:`900`,\"data-path\":`images/dashboard/overview.png`,\"data-optimize\":`true`,\"data-opv\":`3`,srcset:`https://mintcdn.com/accesstive-01e1bd34/2cK1UJhpHt3fjE9x/images/dashboard/overview.png?w=280\u0026fit=max\u0026auto=format\u0026n=2cK1UJhpHt3fjE9x\u0026q=85\u0026s=ae7888c3b8d43a25076521065491e673 280w, https://mintcdn.com/accesstive-01e1bd34/2cK1UJhpHt3fjE9x/images/dashboard/overview.png?w=560\u0026fit=max\u0026auto=format\u0026n=2cK1UJhpHt3fjE9x\u0026q=85\u0026s=c2986511824bdfc705a660a2509860ac 560w, https://mintcdn.com/accesstive-01e1bd34/2cK1UJhpHt3fjE9x/images/dashboard/overview.png?w=840\u0026fit=max\u0026auto=format\u0026n=2cK1UJhpHt3fjE9x\u0026q=85\u0026s=6f5fe045e9b0b08ce7e1681a15428940 840w, https://mintcdn.com/accesstive-01e1bd34/2cK1UJhpHt3fjE9x/images/dashboard/overview.png?w=1100\u0026fit=max\u0026auto=format\u0026n=2cK1UJhpHt3fjE9x\u0026q=85\u0026s=71681ce65e2b0a7c8d01a684fd698c99 1100w, https://mintcdn.com/accesstive-01e1bd34/2cK1UJhpHt3fjE9x/images/dashboard/overview.png?w=1650\u0026fit=max\u0026auto=format\u0026n=2cK1UJhpHt3fjE9x\u0026q=85\u0026s=fbe503ef8449c1f62c3ffcbd4def8923 1650w, https://mintcdn.com/accesstive-01e1bd34/2cK1UJhpHt3fjE9x/images/dashboard/overview.png?w=2500\u0026fit=max\u0026auto=format\u0026n=2cK1UJhpHt3fjE9x\u0026q=85\u0026s=efa8937cb8d32f95af154ee9df7655fd 2500w`})}),`\n`,_jsx(Heading,{level:`2`,id:`add-accesstive-to-your-website`,children:`Add Accesstive to your website`}),`\n`,_jsxs(_components.p,{children:[`Pick the method that fits your website. You find the same options in the dashboard under `,_jsx(_components.strong,{children:`FIND`}),` → `,_jsx(_components.strong,{children:`Widget`}),` → `,_jsx(_components.strong,{children:`Installation Guide`}),`.`]}),`\n`,_jsx(Heading,{level:`3`,id:`option-1-add-the-script-any-website`,children:`Option 1: Add the script (any website)`}),`\n`,_jsxs(Steps,{children:[_jsxs(Step,{title:`Copy your code`,children:[_jsxs(_components.p,{children:[`In the dashboard, open `,_jsx(_components.strong,{children:`FIND`}),` → `,_jsx(_components.strong,{children:`Widget`}),` and expand `,_jsx(_components.strong,{children:`Installation Guide`}),`. Click `,_jsx(_components.strong,{children:`Copy`}),`. Your code looks like this. The `,_jsx(_components.code,{children:`data-token`}),` value is unique to your website:`]}),_jsx(CodeBlock,{filename:``,numberOfLines:`7`,language:`html`,children:_jsx(_components.pre,{className:`shiki shiki-themes github-light github-dark`,style:{backgroundColor:`#fff`,\"--shiki-dark-bg\":`#24292e`,color:`#24292e`,\"--shiki-dark\":`#e1e4e8`},language:`html`,children:_jsxs(_components.code,{language:`html`,numberOfLines:`7`,children:[_jsx(_components.span,{className:`line`,children:_jsx(_components.span,{style:{color:`#6A737D`,\"--shiki-dark\":`#6A737D`},children:`\u003c!-- Accesstive Widget -->`})}),`\n`,_jsxs(_components.span,{className:`line`,children:[_jsx(_components.span,{style:{color:`#24292E`,\"--shiki-dark\":`#E1E4E8`},children:`\u003c`}),_jsx(_components.span,{style:{color:`#22863A`,\"--shiki-dark\":`#85E89D`},children:`script`})]}),`\n`,_jsx(_components.span,{className:`line`,children:_jsx(_components.span,{style:{color:`#6F42C1`,\"--shiki-dark\":`#B392F0`},children:` async`})}),`\n`,_jsxs(_components.span,{className:`line`,children:[_jsx(_components.span,{style:{color:`#6F42C1`,\"--shiki-dark\":`#B392F0`},children:` src`}),_jsx(_components.span,{style:{color:`#24292E`,\"--shiki-dark\":`#E1E4E8`},children:`=`}),_jsx(_components.span,{style:{color:`#032F62`,\"--shiki-dark\":`#9ECBFF`},children:`\"https://cdn.accesstive.com/assistance.js\"`})]}),`\n`,_jsxs(_components.span,{className:`line`,children:[_jsx(_components.span,{style:{color:`#6F42C1`,\"--shiki-dark\":`#B392F0`},children:` type`}),_jsx(_components.span,{style:{color:`#24292E`,\"--shiki-dark\":`#E1E4E8`},children:`=`}),_jsx(_components.span,{style:{color:`#032F62`,\"--shiki-dark\":`#9ECBFF`},children:`\"module\"`})]}),`\n`,_jsxs(_components.span,{className:`line`,children:[_jsx(_components.span,{style:{color:`#6F42C1`,\"--shiki-dark\":`#B392F0`},children:` data-token`}),_jsx(_components.span,{style:{color:`#24292E`,\"--shiki-dark\":`#E1E4E8`},children:`=`}),_jsx(_components.span,{style:{color:`#032F62`,\"--shiki-dark\":`#9ECBFF`},children:`\"YOUR_TOKEN\"`})]}),`\n`,_jsxs(_components.span,{className:`line`,children:[_jsx(_components.span,{style:{color:`#24292E`,\"--shiki-dark\":`#E1E4E8`},children:`>\u003c/`}),_jsx(_components.span,{style:{color:`#22863A`,\"--shiki-dark\":`#85E89D`},children:`script`}),_jsx(_components.span,{style:{color:`#24292E`,\"--shiki-dark\":`#E1E4E8`},children:`>`})]}),`\n`]})})})]}),_jsx(Step,{title:`Paste it into your website`,children:_jsxs(_components.p,{children:[`Paste the code just before the closing `,_jsx(_components.code,{children:`\u003c/body>`}),` tag of your website template, so it loads on every page. Then publish the change.`]})}),_jsx(Step,{title:`Check that it works`,children:_jsx(_components.p,{children:`Open your website and look for the Accesstive icon. If it does not appear, open your browser’s developer console and look for load errors.`})})]}),`\n`,_jsx(Frame,{caption:`FIND → Widget → Installation Guide (token hidden)`,children:_jsx(OptimizedImage,{src:`https://mintcdn.com/accesstive-01e1bd34/2cK1UJhpHt3fjE9x/images/widget/installation-guide.png?fit=max\u0026auto=format\u0026n=2cK1UJhpHt3fjE9x\u0026q=85\u0026s=87812453f8c1c0e4c466637e3038a052`,alt:`Widget Installation Guide tab with the JavaScript code and Copy button`,\"data-og-width\":`1440`,width:`1440`,\"data-og-height\":`900`,height:`900`,\"data-path\":`images/widget/installation-guide.png`,\"data-optimize\":`true`,\"data-opv\":`3`,srcset:`https://mintcdn.com/accesstive-01e1bd34/2cK1UJhpHt3fjE9x/images/widget/installation-guide.png?w=280\u0026fit=max\u0026auto=format\u0026n=2cK1UJhpHt3fjE9x\u0026q=85\u0026s=359ca837f1d5a0fbfa8055b762a9b0ba 280w, https://mintcdn.com/accesstive-01e1bd34/2cK1UJhpHt3fjE9x/images/widget/installation-guide.png?w=560\u0026fit=max\u0026auto=format\u0026n=2cK1UJhpHt3fjE9x\u0026q=85\u0026s=bccf086635899e5545f337bd7665eaa3 560w, https://mintcdn.com/accesstive-01e1bd34/2cK1UJhpHt3fjE9x/images/widget/installation-guide.png?w=840\u0026fit=max\u0026auto=format\u0026n=2cK1UJhpHt3fjE9x\u0026q=85\u0026s=d923465519a994b863b6a55ed446622c 840w, https://mintcdn.com/accesstive-01e1bd34/2cK1UJhpHt3fjE9x/images/widget/installation-guide.png?w=1100\u0026fit=max\u0026auto=format\u0026n=2cK1UJhpHt3fjE9x\u0026q=85\u0026s=457002d4c4f4ae7d78c6169a81dfd03d 1100w, https://mintcdn.com/accesstive-01e1bd34/2cK1UJhpHt3fjE9x/images/widget/installation-guide.png?w=1650\u0026fit=max\u0026auto=format\u0026n=2cK1UJhpHt3fjE9x\u0026q=85\u0026s=50db5de00154c73a776eb959c07d3f57 1650w, https://mintcdn.com/accesstive-01e1bd34/2cK1UJhpHt3fjE9x/images/widget/installation-guide.png?w=2500\u0026fit=max\u0026auto=format\u0026n=2cK1UJhpHt3fjE9x\u0026q=85\u0026s=1a66590ba0f656384eec4595632e820d 2500w`})}),`\n`,_jsx(Heading,{level:`3`,id:`option-2-plugin-or-app-no-coding`,children:`Option 2: Plugin or app (no coding)`}),`\n`,_jsx(_components.p,{children:`Accesstive has plugins and apps for common platforms. For example:`}),`\n`,_jsxs(_components.ul,{children:[`\n`,_jsxs(_components.li,{children:[_jsx(_components.strong,{children:`WordPress`}),`: In your WordPress admin, go to `,_jsx(_components.strong,{children:`Plugins`}),` → `,_jsx(_components.strong,{children:`Add New`}),`, search for “Accesstive Assistant”, click `,_jsx(_components.strong,{children:`Install Now`}),`, then `,_jsx(_components.strong,{children:`Activate`}),`.`]}),`\n`,_jsxs(_components.li,{children:[_jsx(_components.strong,{children:`Shopify`}),`: In Shopify admin, go to `,_jsx(_components.strong,{children:`Apps`}),` → `,_jsx(_components.strong,{children:`Shopify App Store`}),`, search for “Accesstive Assistant”, and click `,_jsx(_components.strong,{children:`Add app`}),`.`]}),`\n`,_jsxs(_components.li,{children:[_jsx(_components.strong,{children:`TYPO3`}),`: Install the official Accesstive extension.`]}),`\n`]}),`\n`,_jsxs(_components.p,{children:[`After activation, the widget loads by itself. See all platforms on the `,_jsx(_components.a,{href:`https://accesstive.com/integration/`,children:`integrations page`}),`.`]}),`\n`,_jsx(Heading,{level:`3`,id:`option-3-google-tag-manager`,children:`Option 3: Google Tag Manager`}),`\n`,_jsxs(_components.ol,{children:[`\n`,_jsxs(_components.li,{children:[`In Google Tag Manager, create a new `,_jsx(_components.strong,{children:`Custom HTML`}),` tag.`]}),`\n`,_jsx(_components.li,{children:`Paste your Accesstive code from Option 1.`}),`\n`,_jsxs(_components.li,{children:[`Set the trigger to `,_jsx(_components.strong,{children:`All Pages`}),`.`]}),`\n`,_jsxs(_components.li,{children:[`Click `,_jsx(_components.strong,{children:`Submit`}),` to publish.`]}),`\n`]}),`\n`,_jsx(Heading,{level:`3`,id:`option-4-host-it-on-your-own-server`,children:`Option 4: Host it on your own server`}),`\n`,_jsxs(_components.p,{children:[`If you need full control, Accesstive can provide a self-hosting package. Contact support from the `,_jsx(_components.strong,{children:`Installation Guide`}),` to set it up.`]}),`\n`,_jsx(Heading,{level:`2`,id:`run-your-first-check`,children:`Run your first check`}),`\n`,_jsxs(Steps,{children:[_jsx(Step,{title:`Use the onboarding strip`,children:_jsxs(_components.p,{children:[`On the `,_jsx(_components.strong,{children:`Dashboard`}),`, the `,_jsx(_components.strong,{children:`Get started with Accesstive`}),` strip shows four steps. You can close it at any time and open it again with the Plus (+) icon.`]})}),_jsx(Step,{title:`Check your website`,children:_jsxs(_components.p,{children:[`Click `,_jsx(_components.strong,{children:`Start monitoring`}),` in the strip, or open `,_jsx(_components.strong,{children:`FIND`}),` → `,_jsx(_components.strong,{children:`Scanner`}),`. Click `,_jsx(_components.strong,{children:`Run Accessibility Check`}),`. See `,_jsx(_components.a,{href:`/monitor`,children:`Scanner and Monitor`}),` for details.`]})}),_jsx(Step,{title:`Open Fix Hub`,children:_jsxs(_components.p,{children:[`When the check is done, open `,_jsx(_components.strong,{children:`FIX`}),` → `,_jsx(_components.strong,{children:`Fix Hub`}),` to assign and fix the issues found.`]})})]}),`\n`,_jsx(Heading,{level:`2`,id:`next-steps`,children:`Next steps`}),`\n`,_jsxs(_components.ul,{children:[`\n`,_jsxs(_components.li,{children:[`Customize the `,_jsx(_components.a,{href:`/widget`,children:`Accessibility Widget`})]}),`\n`,_jsxs(_components.li,{children:[`Check a page with `,_jsx(_components.a,{href:`/live-audit`,children:`Live Audit`})]}),`\n`,_jsxs(_components.li,{children:[`Add pages to the `,_jsx(_components.a,{href:`/monitor`,children:`Monitor`})]}),`\n`,_jsxs(_components.li,{children:[`Work through issues in `,_jsx(_components.a,{href:`/fix-hub`,children:`Fix Hub`})]}),`\n`,_jsxs(_components.li,{children:[`Invite your `,_jsx(_components.a,{href:`/team`,children:`team`})]}),`\n`,_jsxs(_components.li,{children:[`Review `,_jsx(_components.a,{href:`/billing`,children:`plans and billing`})]}),`\n`]}),`\n`,_jsxs(_components.p,{children:[`Need help? Email `,_jsx(_components.a,{href:`mailto:info@accesstive.com`,children:`info@accesstive.com`}),` or call +49 351 48 19 66 61.`]})]})}function MDXContent(props={}){const{wrapper:MDXLayout}={..._provideComponents(),...props.components};return MDXLayout?_jsx(MDXLayout,{...props,children:_jsx(_createMdxContent,{...props})}):_createMdxContent(props)}return{default:MDXContent};function _missingMdxReference(id,component){throw new Error(`Expected `+(component?`component`:`object`)+\" `\"+id+\"` to be defined: you likely forgot to import, pass, or provide it.\")}","frontmatter":{},"scope":{"codeStyling":{"theme":{"light":"github-light","dark":"github-dark"}},"config":{},"pageMetadata":{"title":"Getting started","description":"Sign in to Accesstive, add the Accessibility Widget to your website, and run your first accessibility check.","href":"/getting-started"}}},"mdxSourceWithNoJs":null},"mdxExtracts":{"tableOfContents":[{"title":"Before you begin","slug":"before-you-begin","depth":2,"children":[]},{"title":"Create an account and sign in","slug":"create-an-account-and-sign-in","depth":2,"children":[]},{"title":"Add Accesstive to your website","slug":"add-accesstive-to-your-website","depth":2,"children":[{"title":"Option 1: Add the script (any website)","slug":"option-1-add-the-script-any-website","depth":3,"children":[]},{"title":"Option 2: Plugin or app (no coding)","slug":"option-2-plugin-or-app-no-coding","depth":3,"children":[]},{"title":"Option 3: Google Tag Manager","slug":"option-3-google-tag-manager","depth":3,"children":[]},{"title":"Option 4: Host it on your own server","slug":"option-4-host-it-on-your-own-server","depth":3,"children":[]}]},{"title":"Run your first check","slug":"run-your-first-check","depth":2,"children":[]},{"title":"Next steps","slug":"next-steps","depth":2,"children":[]}],"codeExamples":{}},"jsLinks":[],"subdomain":"accesstive-01e1bd34","siteName":"Accesstive Docs","title":"Getting started - Accesstive Docs","navMaps":{"firstHrefInVersion":{},"firstHrefInLanguage":{}},"lastModified":"2026-11-19T10:51:41.015Z","originalFileLocation":"getting-started.mdx"},"headHtml":"\u003cscript data-mint-head>(function(){var d=document.documentElement,p=null;if(!p){try{p=localStorage.getItem(\"isDarkMode\")}catch(e){}if(p==='true')p='dark';else if(p==='false')p='light';if(p!=='light'\u0026\u0026p!=='dark'\u0026\u0026p!=='system')p=\"system\"}var r=p==='system'?(matchMedia(\"(prefers-color-scheme: dark)\").matches?'dark':'light'):p;d.classList.remove(r==='dark'?'light':'dark');d.classList.add(r);d.setAttribute(\"data-theme-preference\",p)})();\u003c/script>\u003cmeta data-mint-head name=\"description\" content=\"Sign in to Accesstive, add the Accessibility Widget to your website, and run your first accessibility check.\">\u003cmeta data-mint-head name=\"application-name\" content=\"Accesstive Docs\">\u003cmeta data-mint-head name=\"generator\" content=\"Mintlify\">\u003clink data-mint-head rel=\"icon\" type=\"image/png\" sizes=\"192x192\" href=\"/mintlify-assets/_mintlify/favicons/accesstive-01e1bd34/HQJmPJER068nwFxx/_generated/favicon/android-chrome-192x192.png\" media=\"(prefers-color-scheme: light)\">\u003clink data-mint-head rel=\"apple-touch-icon\" type=\"image/png\" sizes=\"180x180\" href=\"/mintlify-assets/_mintlify/favicons/accesstive-01e1bd34/HQJmPJER068nwFxx/_generated/favicon/apple-touch-icon.png\">\u003clink data-mint-head rel=\"icon\" type=\"image/png\" sizes=\"16x16\" href=\"/mintlify-assets/_mintlify/favicons/accesstive-01e1bd34/HQJmPJER068nwFxx/_generated/favicon/favicon-16x16.png\" media=\"(prefers-color-scheme: light)\">\u003clink data-mint-head rel=\"icon\" type=\"image/png\" sizes=\"32x32\" href=\"/mintlify-assets/_mintlify/favicons/accesstive-01e1bd34/HQJmPJER068nwFxx/_generated/favicon/favicon-32x32.png\" media=\"(prefers-color-scheme: light)\">\u003clink data-mint-head rel=\"shortcut icon\" type=\"image/x-icon\" href=\"/mintlify-assets/_mintlify/favicons/accesstive-01e1bd34/HQJmPJER068nwFxx/_generated/favicon/favicon.ico\" media=\"(prefers-color-scheme: light)\">\u003clink data-mint-head rel=\"icon\" type=\"image/png\" sizes=\"192x192\" href=\"/mintlify-assets/_mintlify/favicons/accesstive-01e1bd34/HQJmPJER068nwFxx/_generated/favicon-dark/android-chrome-192x192.png\" media=\"(prefers-color-scheme: dark)\">\u003clink data-mint-head rel=\"icon\" type=\"image/png\" sizes=\"16x16\" href=\"/mintlify-assets/_mintlify/favicons/accesstive-01e1bd34/HQJmPJER068nwFxx/_generated/favicon-dark/favicon-16x16.png\" media=\"(prefers-color-scheme: dark)\">\u003clink data-mint-head rel=\"icon\" type=\"image/png\" sizes=\"32x32\" href=\"/mintlify-assets/_mintlify/favicons/accesstive-01e1bd34/HQJmPJER068nwFxx/_generated/favicon-dark/favicon-32x32.png\" media=\"(prefers-color-scheme: dark)\">\u003clink data-mint-head rel=\"shortcut icon\" type=\"image/x-icon\" href=\"/mintlify-assets/_mintlify/favicons/accesstive-01e1bd34/HQJmPJER068nwFxx/_generated/favicon-dark/favicon.ico\" media=\"(prefers-color-scheme: dark)\">\u003cmeta data-mint-head property=\"og:title\" content=\"Getting started - Accesstive Docs\">\u003cmeta data-mint-head property=\"og:description\" content=\"Sign in to Accesstive, add the Accessibility Widget to your website, and run your first accessibility check.\">\u003cmeta data-mint-head property=\"og:site_name\" content=\"Accesstive Docs\">\u003cmeta data-mint-head property=\"og:url\" content=\"https://accesstive-01e1bd34.mintlify.app/getting-started\">\u003cmeta data-mint-head property=\"og:type\" content=\"website\">\u003cmeta data-mint-head property=\"og:image\" content=\"https://accesstive-01e1bd34.mintlify.site/_mintlify/api/og/v2?division=Get+started\u0026amp;title=Getting+started\u0026amp;description=Sign+in+to+Accesstive%2C+add+the+Accessibility+Widget+to+your+website%2C+and+run+your+first+accessibility+check.\u0026amp;theme=ec38492c2f9011d9a380cbeb\u0026amp;signature=463d37fbe0d13b3fc1aab9b388057de58b7b4b87f3d6895b905fe4a1e4e813c8\">\u003cmeta data-mint-head property=\"og:image:width\" content=\"1200\">\u003cmeta data-mint-head property=\"og:image:height\" content=\"630\">\u003cmeta data-mint-head name=\"twitter:card\" content=\"summary_large_image\">\u003cmeta data-mint-head name=\"twitter:title\" content=\"Getting started - Accesstive Docs\">\u003cmeta data-mint-head name=\"twitter:description\" content=\"Sign in to Accesstive, add the Accessibility Widget to your website, and run your first accessibility check.\">\u003cmeta data-mint-head name=\"twitter:image\" content=\"https://accesstive-01e1bd34.mintlify.site/_mintlify/api/og/v2?division=Get+started\u0026amp;title=Getting+started\u0026amp;description=Sign+in+to+Accesstive%2C+add+the+Accessibility+Widget+to+your+website%2C+and+run+your+first+accessibility+check.\u0026amp;theme=ec38492c2f9011d9a380cbeb\u0026amp;signature=463d37fbe0d13b3fc1aab9b388057de58b7b4b87f3d6895b905fe4a1e4e813c8\">\u003cmeta data-mint-head name=\"twitter:image:width\" content=\"1200\">\u003cmeta data-mint-head name=\"twitter:image:height\" content=\"630\">\u003cmeta data-mint-head name=\"msapplication-config\" content=\"/mintlify-assets/_mintlify/favicons/accesstive-01e1bd34/HQJmPJER068nwFxx/_generated/favicon/browserconfig.xml\">\u003cmeta data-mint-head name=\"apple-mobile-web-app-title\" content=\"Accesstive Docs\">\u003cmeta data-mint-head name=\"msapplication-TileColor\" content=\"#0101D9\">\u003cmeta data-mint-head name=\"og:locale\" content=\"en_US\">\u003clink data-mint-head rel=\"canonical\" href=\"https://accesstive-01e1bd34.mintlify.app/getting-started\">\u003clink data-mint-head rel=\"alternate\" type=\"application/xml\" href=\"/sitemap.xml\">\u003clink data-mint-head rel=\"alternate\" type=\"text/markdown\" href=\"/getting-started.md\">\u003cscript data-mint-head type=\"application/ld+json\">{\"@context\":\"https://schema.org\",\"@graph\":[{\"@type\":\"Organization\",\"@id\":\"https://accesstive-01e1bd34.mintlify.app/#organization\",\"name\":\"Accesstive Docs\",\"url\":\"https://accesstive-01e1bd34.mintlify.app\",\"logo\":{\"@type\":\"ImageObject\",\"url\":\"https://mintcdn.com/accesstive-01e1bd34/2cK1UJhpHt3fjE9x/logo/light.svg?fit=max\u0026auto=format\u0026n=2cK1UJhpHt3fjE9x\u0026q=85\u0026s=13e20deb45a95510c3530812fe994631\"}},{\"@type\":\"WebSite\",\"@id\":\"https://accesstive-01e1bd34.mintlify.app#website\",\"name\":\"Accesstive Docs\",\"url\":\"https://accesstive-01e1bd34.mintlify.app\",\"publisher\":{\"@id\":\"https://accesstive-01e1bd34.mintlify.app/#organization\"}},{\"@type\":\"WebPage\",\"@id\":\"https://accesstive-01e1bd34.mintlify.app/getting-started#webpage\",\"url\":\"https://accesstive-01e1bd34.mintlify.app/getting-started\",\"name\":\"Getting started\",\"description\":\"Sign in to Accesstive, add the Accessibility Widget to your website, and run your first accessibility check.\",\"dateModified\":\"2026-11-19T10:51:41.015Z\",\"isPartOf\":{\"@id\":\"https://accesstive-01e1bd34.mintlify.app#website\"},\"breadcrumb\":{\"@id\":\"https://accesstive-01e1bd34.mintlify.app/getting-started#breadcrumb\"}},{\"@type\":\"BreadcrumbList\",\"@id\":\"https://accesstive-01e1bd34.mintlify.app/getting-started#breadcrumb\",\"itemListElement\":[{\"@type\":\"ListItem\",\"position\":1,\"name\":\"Accesstive Docs\",\"item\":\"https://accesstive-01e1bd34.mintlify.app\"},{\"@type\":\"ListItem\",\"position\":2,\"name\":\"Getting started\",\"item\":\"https://accesstive-01e1bd34.mintlify.app/getting-started\"}]},{\"@type\":[\"Article\",\"TechArticle\"],\"@id\":\"https://accesstive-01e1bd34.mintlify.app/getting-started#article\",\"headline\":\"Getting started\",\"name\":\"Getting started\",\"description\":\"Sign in to Accesstive, add the Accessibility Widget to your website, and run your first accessibility check.\",\"url\":\"https://accesstive-01e1bd34.mintlify.app/getting-started\",\"mainEntityOfPage\":{\"@id\":\"https://accesstive-01e1bd34.mintlify.app/getting-started#webpage\"},\"dateModified\":\"2026-11-19T10:51:41.015Z\",\"publisher\":{\"@id\":\"https://accesstive-01e1bd34.mintlify.app/#organization\"},\"isPartOf\":{\"@id\":\"https://accesstive-01e1bd34.mintlify.app#website\"}}]}\u003c/script>\u003cscript data-mint-head type=\"application/ld+json\">{\"@context\":\"https://schema.org\",\"@type\":\"WebSite\",\"name\":\"Accesstive Docs\",\"publisher\":{\"@type\":\"Organization\",\"name\":\"Accesstive Docs\"},\"provider\":{\"@type\":\"Organization\",\"name\":\"Mintlify\",\"url\":\"https://mintlify.com\"}}\u003c/script>","agentPointerHref":"/getting-started.md","siteName":"Accesstive Docs","nav":{"global":null,"groups":[{"group":"Home","icon":"house","expanded":true,"pages":[{"title":"Welcome to Accesstive Docs","description":"Guides for the Accesstive dashboard: install the widget, find accessibility issues, fix them, and document your work.","sidebarTitle":"Home","href":"/index"}]},{"group":"Get started","icon":"rocket","expanded":true,"pages":[{"title":"Getting started","href":"/getting-started"},{"title":"Dashboard tour","description":"Find your way around the Accesstive dashboard: the FIND, FIX, and PROVE menus, Team, Account / Billing, and the top toolbar.","href":"/dashboard"}]},{"group":"FIND","icon":"search","expanded":true,"pages":[{"title":"Scanner and Monitor","href":"/monitor"},{"title":"Live Audit","href":"/live-audit"},{"title":"Lighthouse","href":"/lighthouse"},{"title":"Accessibility Widget","href":"/widget"}]},{"group":"FIX","icon":"wrench","expanded":true,"pages":[{"title":"Fix Hub","href":"/fix-hub"},{"title":"AI Alt Text Manager","href":"/alt-text"},{"title":"Human Expert Audit","href":"/human-expert-audit"}]},{"group":"PROVE","icon":"badge-check","expanded":true,"pages":[{"title":"Accessibility Statement","href":"/accessibility-statement"},{"title":"Color Contrast Checker","href":"/contrast-checker"}]},{"group":"Account","icon":"circle-user","expanded":true,"pages":[{"title":"Team","href":"/team"},{"title":"Plans and billing","href":"/billing"},{"title":"Profile and account","href":"/account"},{"title":"FAQ","href":"/faq"}]}]},"basePath":"","title":"Getting started - Accesstive Docs","deploymentId":"dpl_FZMKUpaaKiVETbfqhoUe4sPFDTmY","buildId":"dpl_FZMKUpaaKiVETbfqhoUe4sPFDTmY","dynamics":["07c022d89b","a74be98ba7"],"chunks":["Frame-DBAS9Liu.js","DynamicMarkdown-C4w9kavL.js","zoom-image-lightbox-B9O1U98p.js","lightbox-handle-r17bVUz3.js"]}